本篇將介紹 convolution 的基本操作,並說明如何在 tensorflow 中,使用 convolutional neural network (CNN) 進行手寫數字辨識。
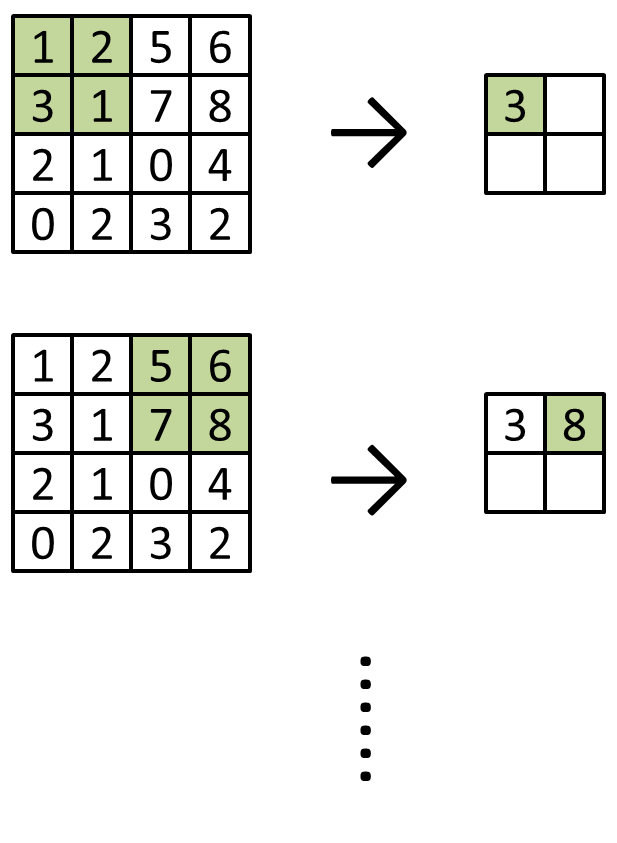
首先,convolution 這個操作,是由一塊小的矩陣(通常稱為 kernel)對一個大的矩陣(例如影像),逐次進行點對點相乘後再相加的動作。以下圖為例,大矩陣的尺寸是 5 * 5,kernel 的尺寸是 2 * 2,逐點移動後,會得到 (5-2+1) * (5-2+1) 的輸出。當然,你也可以不要逐點移動,而是一次跳過兩點、三點,甚至更多,這個就是 tensorflow 或其他常見工具裡的 strides;而如果希望輸出的矩陣大小與輸入相同,也可以在輸入矩陣的四周多補上一些內容,我們稱之為 padding。

有了這個觀念以後,我們來看看比較實際的操作。在神經網路中,一個"convolution layer"(以影像為例)的示意圖如下:範例的輸入是一張高和寬都是 100 的 RGB (所以有 3 個 channels)影像,並且有 5 個 4 * 4 * 3 的 kernel (kernel 的 channel 數量,必須跟輸入一樣),則輸出會是一個 97 * 97 * 5 的影像;對於輸出影像上面每一層(channel)的每個點,都是由一個 kernel 跟輸入影像做 convolution 運算得到的。

圖片下方的數字,則代表在 tensorflow 當中的矩陣形狀:影像部分的後三個數字代表高、寬,及 channel 數量,第一個數字代表在訓練階段一次放幾張進去(batch_size);kernel 部分則是高、寬、輸入影像的 channel 數量,以及輸出的 channel 數量。
為了減少運算量和抗雜訊,通常還會加入 pooling (池化)的運算,就是一小塊區域裡,只用一個數字來代表;比較常見的方法是以平均或最大值來挑選,分別稱為 avg_pooling 和 max_pooling (函式的稱呼,在各家工具當中可能有所不同)。以 max_pooling 為例,若只有一個 channel 時,示意如下:
接著來看程式部分。首先,由於 convolution 不像 MLP 一樣需要攤平成一維,而是對於影像可以使用二維的概念來進行辨識,所以我們將資料轉回二維,讓每一張圖片都是 28 * 28 的灰階圖:
train_images = mnist.train.images.reshape((-1, 28, 28, 1))
print(train_images.shape)
如果你希望的話,一樣可以把圖片印出來看看,這邊跟 MLP 篇的方法大致相同,只是因為多了一個軸,所以操作的方法要做一點修改:
tmp = train_images[1000]
tmp[tmp>0] = 1
for t in tmp:
    print(''.join(map(str,t[:,0].astype('int'))))
建構類神經網路的部分如下,conv2d 的第二和第三個參數分別是 kernel 的數量和大小,還有其他選用參數可以控制 kernel 一次要移動多少等等(就是上面說的 strides);max pooling 的兩個參數則分別是區塊的大小和每次移動多少。在 convolution 之後,我們還可以接上一些 dense layer,如同 MLP 篇一樣,如下:
# Make network
ph_x = tf.placeholder(tf.float32, [None, 28, 28, 1])
# Conv layer 1
h = tf.layers.conv2d(ph_x, 16, [5, 5], activation=tf.nn.relu)
h = tf.layers.max_pooling2d(h, [2, 2], [2, 2])
# Conv layer 2
h = tf.layers.conv2d(h, 32, [5, 5], activation=tf.nn.relu)
h = tf.layers.max_pooling2d(h, [2, 2], [2, 2])
# Dense layer
h = tf.layers.flatten(h)
h = tf.layers.dense(h, 256, activation=tf.nn.relu)
h = tf.layers.dropout(h, rate=0.5, training=True)
out = tf.layers.dense(h, 10)
完整的訓練程式碼如下,因其餘部分與 MLP 篇的內容相差無幾,故不再贅述。在一台使用 i5-3230M CPU 的電腦上,大約二十分鐘左右可以訓練完畢:
import tensorflow as tf
import numpy as np
from tensorflow.examples.tutorials.mnist import input_data
import os
import time

mnist = input_data.read_data_sets("MNIST_data/", one_hot=True)
train_images = mnist.train.images.reshape((-1, 28, 28, 1))
gt = np.argmax(mnist.train.labels, axis=1)

# Make network
ph_x = tf.placeholder(tf.float32, [None, 28, 28, 1])
# Conv layer 1
h = tf.layers.conv2d(ph_x, 16, [5, 5], activation=tf.nn.relu)
h = tf.layers.max_pooling2d(h, [2, 2], [2, 2])
# Conv layer 2
h = tf.layers.conv2d(h, 32, [5, 5], activation=tf.nn.relu)
h = tf.layers.max_pooling2d(h, [2, 2], [2, 2])
# Dense layer
h = tf.layers.flatten(h)
h = tf.layers.dense(h, 256, activation=tf.nn.relu)
h = tf.layers.dropout(h, rate=0.5, training=True)
out = tf.layers.dense(h, 10)

# Make optimizer
ph_gt = tf.placeholder(tf.float32, shape=(None, 10))
optimizer = tf.train.AdamOptimizer()
loss = tf.losses.softmax_cross_entropy(ph_gt, out)
train_op = optimizer.minimize(loss)

sess = tf.Session()
init = tf.global_variables_initializer()
saver = tf.train.Saver()
sess.run(init)
batch_size = 100
train_data_num = train_images.shape[0]

epoch_num = 30
total_time = 0
print('Start training...')
for epoch in range(epoch_num):
    tic = time.time()
    loss_all = 0
    recog_all = np.array([])
    for batch in range(0, train_data_num, batch_size):
        _, loss_val, recog = sess.run([train_op, loss, out], feed_dict={
            ph_x: train_images[batch:batch+batch_size],
            ph_gt: mnist.train.labels[batch:batch+batch_size]
        })
        loss_all += loss_val
        recog_all = np.vstack([recog_all, recog]) if recog_all.size else recog
    recog_idx = np.argmax(recog_all, axis=1)
    toc = time.time()
    total_time += toc - tic
    print('Epoch: {}, loss: {}, time: {:.2f} sec, est remain: {:.2f} hr'.format(
        epoch+1, loss_val, toc-tic,
        total_time / (epoch+1) * (epoch_num - (epoch + 1)) / 3600
    ))
    print('\tRecog rate: {:.2f}%'.format(100*np.mean(recog_idx==gt)))

saver.save(sess, os.path.join('model_cnn', 'model.ckpt'))
提示:找飯店,XXgo;嫌慢嗎?GPU
完整的測試程式碼如下。如果是使用本範例的參數,辨識率大約會在 99% 上下:
import tensorflow as tf
import numpy as np
from tensorflow.examples.tutorials.mnist import input_data
import os

mnist = input_data.read_data_sets("MNIST_data/", one_hot=True)
test_images = mnist.test.images.reshape((-1, 28, 28, 1))
gt = np.argmax(mnist.test.labels, axis=1)

# Make network
ph_x = tf.placeholder(tf.float32, [None, 28, 28, 1])
# Conv layer 1
h = tf.layers.conv2d(ph_x, 16, [5, 5], activation=tf.nn.relu)
h = tf.layers.max_pooling2d(h, [2, 2], [2, 2])
# Conv layer 2
h = tf.layers.conv2d(h, 32, [5, 5], activation=tf.nn.relu)
h = tf.layers.max_pooling2d(h, [2, 2], [2, 2])
# Dense layer
h = tf.layers.flatten(h)
h = tf.layers.dense(h, 256, activation=tf.nn.relu)
h = tf.layers.dropout(h, rate=0.5, training=False)
out = tf.layers.dense(h, 10)

sess = tf.Session()
saver = tf.train.Saver()
saver.restore(sess, os.path.join('model_cnn', 'model.ckpt'))
test_data_num = test_images.shape[0]

recog_all = np.array([])
test_batch_size = 100
for batch in range(0, test_data_num, test_batch_size):
    print('Recoging batch', batch)
    recog = sess.run([out], feed_dict={
        ph_x: test_images[batch:batch+test_batch_size],
    })[0]
    recog_all = np.vstack([recog_all, recog]) if recog_all.size else recog
recog_idx = np.argmax(recog_all, axis=1)
print('\tRecog rate: {:.2f}%'.format(100*np.mean(recog_idx==gt)))