本篇將以爬取網頁版 Ptt 的資料為例,介紹如何用 Python 製作網路爬蟲;需要使用第三方套件時,將在第一次 import 時以註解方式提供安裝指令。另外,由於爬蟲的撰寫會跟網站的設計細節高度相關,但本篇內容不可能隨時依據目標網站更動而修改,因此本篇的範例,隨時都會有失效的可能。
Ptt 網頁版的首頁連結是 https://www.ptt.cc/bbs/index.html,單一看板的連結則是 https://www.ptt.cc/bbs/看板名稱/index.html,例如 Python 板是 https://www.ptt.cc/bbs/Python/index.html。如果你想要獲得 Python 板的內容,最簡單的方法就是用 Requests 函式庫的相關方法來進行操作:
import requests # pip install requests

response = requests.get('https://www.ptt.cc/bbs/Python/index.html')
print(response.text)
在上述範例中,你可以發現印出來的內容是一堆 HTML 原始碼。我們當然可以自己撰寫字串處理來取得需要的內容,但也可以使用 Beautiful Soup 函式庫來幫我們進行剖析(parse)。以下範例將示範如何取得特定的超連結資訊:
import requests
from bs4 import BeautifulSoup # pip install beautifulsoup4

response = requests.get('https://www.ptt.cc/bbs/Python/index.html')
soup = BeautifulSoup(response.text, 'html.parser')
print(soup.body.div.div.a)
print(soup.find_all('a', class_='btn wide'))
在上述範例中:
- 我們需先用 requests.get 取得網頁原始碼後,再用 BeautifulSoup 來剖析取得的內容。
- 「soup.body.div.div.a」當中的「.」代表取得第一個子物件;整段程式碼翻譯成白話是「soup(剖析結果)的第一個 body 裡面的第一個 div 裡面的第一個 div 裡面的第一個 a」。至於「.」需要用幾層,跟你要爬取的網頁原始碼架構和爬取目標有關。
- 我們也可以用 find_all,直接找出特定條件的物件們,就不必一層一層一個一個地抓取。範例中的「class_='btn wide'」,代表要找尋標籤中的 class 屬性中,有包含「btn wide」者。
找出物件後,就可以進行其他你想要的處理,甚至若物件有多層時,也可以一層一層的往下剖析。以下的範例是從最新頁面往回,逐頁擷取 Python 看板文章的作者、列表顯示的推噓數、文章標題,以及連結,直至處理完該頁後達 50 篇以上為止
import requests
from bs4 import BeautifulSoup

HOST = 'https://www.ptt.cc'
response = requests.get(HOST + '/bbs/Python/index.html')
soup = BeautifulSoup(response.text, 'html.parser')

articles = []
while len(articles) < 50:
	# Get articles in this page
	for article in soup.find_all('div', class_='r-ent'):
		rec, title_block, meta = article.find_all('div', recursive=False)
		articles.append({
			'author': meta.div.text,
			'rec': rec.text,
			'title': title_block.a.text if title_block.a else title_block.text.strip(),
			'link': title_block.a['href'] if title_block.a else '',
		})
	# Move to previous page
	x = soup.find_all('a', class_='btn wide')
	link_to_prev = HOST + soup.find_all('a', class_='btn wide')[1]['href']
	response = requests.get(link_to_prev)
	soup = BeautifulSoup(response.text, 'html.parser')

# Display
for a in articles:
	print(a)
在上述範例中:
- find_all 的 recursive=False 代表只會往下找一層
- soup 物件的「.text」,代表取得被標籤包住的內容
- 用「.」試圖取得不存在的下層標籤時,會得到 None
- 取得標籤屬性值時,用的是字典(dictionary)的語法
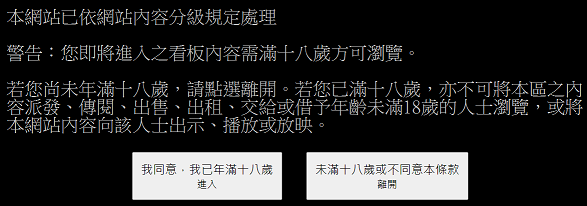
大部分的看板,都可以依此類推來取得資訊,只是有些看板(例如 Beauty 板)會碰到一點問題:

此時若你按下 F12,打開"開發人員工具"觀察,就可以發現這個按鈕會產生一組「over18=1」的 cookie(讓網頁用來記得你的某種手段的名稱),因此我們可以在發出請求時加上這組 cookie,就能爬取內容。以下範例一樣是從最新一頁往回擷取資訊直至滿 50 篇,只是把看板從 Python 板換成 Beauty 板,以及在發出請求時加上 cookie:
import requests
from bs4 import BeautifulSoup

HOST = 'https://www.ptt.cc'
COOKIE = {'over18': '1'}

response = requests.get(HOST + '/bbs/Beauty/index.html', cookies=COOKIE)
soup = BeautifulSoup(response.text, 'html.parser')

articles = []
while len(articles) < 50:
	# Get articles in this page
	for article in soup.find_all('div', class_='r-ent'):
		rec, title_block, meta = article.find_all('div', recursive=False)
		articles.append({
			'author': meta.div.text,
			'rec': rec.text,
			'title': title_block.a.text if title_block.a else title_block.text.strip(),
			'link': title_block.a['href'] if title_block.a else '',
		})
	# Move to previous page
	x = soup.find_all('a', class_='btn wide')
	link_to_prev = HOST + soup.find_all('a', class_='btn wide')[1]['href']
	response = requests.get(link_to_prev, cookies=COOKIE)
	soup = BeautifulSoup(response.text, 'html.parser')

# Display
for a in articles:
	print(a)
如果你覺得自己管理 cookie 不太方便,那麼也可以使用 requests.Session 物件來處理。在以下範例中,我們先對 /ask/over18 送出必要的資訊以取得 cookie,之後就不用自己在每次請求時附加 cookie:
import requests
from bs4 import BeautifulSoup

HOST = 'https://www.ptt.cc'
PAYLOAD = {
    'from': '/bbs/Beauty/index.html',
    'yes': 'yes',
}

r = requests.Session()
r.post(HOST + '/ask/over18?from=%2Fbbs%2FBeauty%2Findex.html', PAYLOAD)
response = r.get(HOST + '/bbs/Beauty/index.html')
soup = BeautifulSoup(response.text, 'html.parser')

articles = []
while len(articles) < 50:
	# Get articles in this page
	for article in soup.find_all('div', class_='r-ent'):
		rec, title_block, meta = article.find_all('div', recursive=False)
		articles.append({
			'author': meta.div.text,
			'rec': rec.text,
			'title': title_block.a.text if title_block.a else title_block.text.strip(),
			'link': title_block.a['href'] if title_block.a else '',
		})
	# Move to previous page
	x = soup.find_all('a', class_='btn wide')
	link_to_prev = HOST + soup.find_all('a', class_='btn wide')[1]['href']
	response = r.get(link_to_prev)
	soup = BeautifulSoup(response.text, 'html.parser')

# Display
for a in articles:
	print(a)