如果要對音訊加上一些效果,甚至進行自訂的編輯,就需要透過 Web Audio API 來達成。他的基本概念是,把輸入、輸出、及各種音訊操作都看成是節點,只要把節點適當的串接起來,就可以達到許多複雜的效果。需要注意的是,目前(2019 年初)這是一個實驗性功能,因此在部分瀏覽器上(如 IE 等)可能仍不適用;而若在使用 Chrome 等瀏覽器測試範例時碰到問題,則可以換用 Firefox 或其他瀏覽器試試看。
Web Audio API 的操作步驟,大致可分成建立物件、建立節點、設定節點、連接節點等四個。我們先以產生正弦波,並且能同時控制頻率與音量做為範例。各位可以順便試試看自己的耳朵,可以聽到多高頻的聲音?
<!DOCTYPE html>
<html><head></head>
<body bgcolor="#ccccff">

頻率:<input type="range" min=20 max=20000 step=1 value="440" style="width:300px" id="freqCtrl"> <span id="showFreq"></span>
<br>
音量:<input type="range" min=0 max=1 step=0.1 value="0.3" style="width:300px" id="volCtrl"> <span id="showVol"></span>
<br><br>
<input type="button" value="Play" id="ctrl">

<script>
AudioContext = window.AudioContext || window.webkitAudioContext;
audioCtx = new AudioContext();
oscillator = audioCtx.createOscillator();
gainNode = audioCtx.createGain();
oscillator.connect(gainNode);

oscillator.type = 'sine';
oscillator.frequency.value = document.getElementById('freqCtrl').value;
document.getElementById('showFreq').innerHTML = document.getElementById('freqCtrl').value;
document.getElementById('freqCtrl').onchange = function(){
	document.getElementById('showFreq').innerHTML = this.value;
	oscillator.frequency.value = this.value;
}

gainNode.gain.value = document.getElementById('volCtrl').value;
document.getElementById('showVol').innerHTML = document.getElementById('volCtrl').value;
document.getElementById('volCtrl').onchange = function(){
	document.getElementById('showVol').innerHTML = this.value;
	gainNode.gain.value = this.value;
}

document.getElementById('ctrl').onclick = function(){
	if(this.value == 'Play'){
		try {
			oscillator.start(); // 必須以事件啟動,而且只能呼叫一次
		}
		catch {
			//
		}
		gainNode.connect(audioCtx.destination);
		this.value = 'Pause';
	}
	else {
		gainNode.disconnect(audioCtx.destination);
		this.value = 'Play';
	}
}

</script>

</body></html>
若將 createOscillator 改成 createMediaElementSource,則可以將 audio 標籤的音訊做為來源;而若使用 createScriptProcessor 做為節點,則可以進行一些自訂的處理。需要注意的是,因為瀏覽器對 JavaScript 的安全性限制,若要自行嘗試執行範例,則可能需要架設伺服器,或者上傳到網頁空間(支援靜態網頁即可,如利用 GitHub)。以下範例使用到了 low pass filter, high pass filter 以及自訂處理,來示範簡單的人聲移除。若你無法用 Chrome 測試此範例,可能需要換用 Firefox:
<!DOCTYPE html>
<html><head></head>
<body bgcolor="#ccccff">

<audio src="../pics/good_morning_short.mp3"></audio>
音量:<input type="range" min=0 max=1 step=0.1 value="0.3" style="width:300px" id="volCtrl">
<span id="showVol"></span>
<br>
頻率:<input type="range" min=100 max=500 step=1 value="120" style="width:300px" id="freqCtrl">
<span id="showFreq"></span>
<br>
<br><br>
<input type="button" value="Backgorund" id="ctrlSrc">
<input type="button" value="Play" id="ctrlPlay">

<script>
AudioContext = window.AudioContext || window.webkitAudioContext;
audioCtx = new AudioContext();
audio = document.getElementsByTagName('audio')[0];

source = audioCtx.createMediaElementSource(audio);
filterLowPass = audioCtx.createBiquadFilter();
filterHighPass = audioCtx.createBiquadFilter();
processor = audioCtx.createScriptProcessor(2048, 2, 1);
mix = audioCtx.createGain();
gainNode = audioCtx.createGain();

gainNode.gain.value = document.getElementById('volCtrl').value;
document.getElementById('showVol').innerHTML = document.getElementById('volCtrl').value;
document.getElementById('volCtrl').onchange = function(){
	document.getElementById('showVol').innerHTML = this.value;
	gainNode.gain.value = this.value;
}

filterLowPass.type = 'lowpass';
filterHighPass.type = 'highpass';
filterLowPass.frequency.value = document.getElementById('freqCtrl').value;
filterHighPass.frequency.value = document.getElementById('freqCtrl').value;
document.getElementById('showFreq').innerHTML = document.getElementById('freqCtrl').value;
document.getElementById('freqCtrl').onchange = function(){
	document.getElementById('showFreq').innerHTML = this.value;
	filterLowPass.frequency.value = this.value;
	filterHighPass.frequency.value = this.value;
}

processor.onaudioprocess = function(evt){
	var inputL = evt.inputBuffer.getChannelData(0);
	var inputR = evt.inputBuffer.getChannelData(1);
	var output = evt.outputBuffer.getChannelData(0);
	for(var i = 0; i < inputL.length; i++){
		output[i] = inputL[i] - inputR[i];
	}
}

source.connect(filterLowPass);
source.connect(filterHighPass);
filterLowPass.connect(mix);
filterHighPass.connect(processor);
processor.connect(mix);
mix.connect(gainNode);
source.connect(gainNode);

document.getElementById('ctrlSrc').onclick = function(){
	if(this.value == 'Backgorund'){
		mix.connect(gainNode);
		source.disconnect(gainNode);
		this.value = 'Original';
	}
	else {
		mix.disconnect(gainNode);
		source.connect(gainNode);
		this.value = 'Backgorund';
	}
}

document.getElementById('ctrlPlay').onclick = function(){
	if(this.value == 'Play'){
		audio.play();
		gainNode.connect(audioCtx.destination);
		this.value = 'Pause';
	}
	else {
		audio.pause();
		gainNode.disconnect(audioCtx.destination);
		this.value = 'Play';
	}
}

</script>

</body></html>
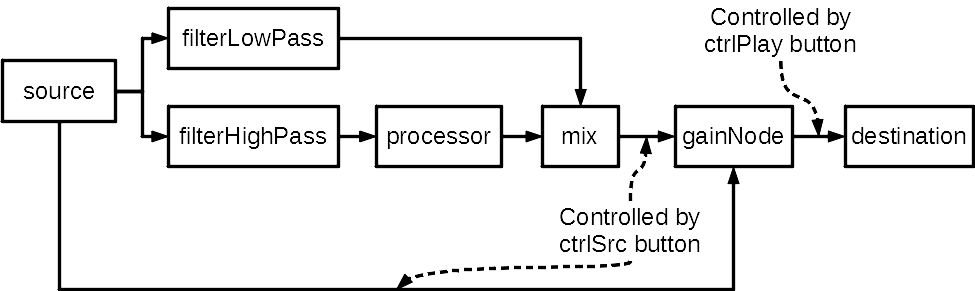
上述範例中的節點連接方式如下:
這個範例則是利用 decodeAudioData 取得音訊內容,將其波形繪製於 canvas,並在 audio 及 canvas 上加入一些事件以進行互動(加入事件的部分還可以發揮很多創意,例如播放/顯示選取區間):
<!DOCTYPE html>
<html><head></head>
<body bgcolor="#ccccff">
<canvas id="myCanvas" width="1000" height="200" style="border:1px solid;position:absolute;top:30px;left:50px;"></canvas>
<div style="border:0px solid;position:absolute;top:250px;left:50px;padding:5px">
<p><audio id="myAudio" src="" controls></audio></p>
<p>檢視比例: (-) <input type="range" value="1000" min="500" max="4000" step="50" onchange="redrawWave(this.value)"> (+)</p>
</div>
<script>
// Ref: https://stackoverflow.com/questions/22073716/create-a-waveform-of-the-full-track-with-web-audio-api
// Audio variables
AudioContext = window.AudioContext || window.webkitAudioContext;
audioCtx = new AudioContext();
myAudio = document.getElementById("myAudio");
currentBuffer = null;
downSampleRate = 400;
// Canvas variables
canvas = document.getElementById("myCanvas");
canvasCtx = canvas.getContext("2d");
function loadMusic(url){
var req = new XMLHttpRequest();
req.open("GET", url, true);
req.responseType = "arraybuffer";
req.onreadystatechange = function(e){
if(req.readyState == 4){
if(req.status == 200){
audioCtx.decodeAudioData(req.response, function(buffer){
currentBuffer = buffer;
displayBuffer(buffer.getChannelData(0)); // Draw left channel only
myAudio.src = url;
}, function (){
alert('Error while decoding your file.');
});
}
else {
alert('Error during the load. Wrong url or cross origin issue.');
}
}
};
req.send();
}
function canvasXToSec(x){
return x / canvas.width * currentBuffer.duration;
}
function secToCanvasX(sec){
return sec / currentBuffer.duration * canvas.width;
}
function sampleIdxToCanvasX(sampleIdx, sigLen){
return Math.floor( canvas.width * sampleIdx / sigLen);
}
function drawVertoclaLineAtX(x){
canvasCtx.lineWidth = 1;
canvasCtx.beginPath();
canvasCtx.strokeStyle = "#77f";
canvasCtx.moveTo(x, 0);
canvasCtx.lineTo(x, canvas.height);
canvasCtx.stroke();
}
function displayBuffer(sig){
canvasCtx.fillStyle = '#fff';
canvasCtx.fillRect(0, 0, canvas.width, canvas.height);
canvasCtx.strokeStyle = '#000';
canvasCtx.lineWidth = 1;
for (var i=0; i<sig.length; i+=downSampleRate) {
var x = sampleIdxToCanvasX(i, sig.length);
var y = sig[i] * canvas.height / 2 + canvas.height / 2;
canvasCtx.beginPath();
canvasCtx.moveTo(x, canvas.height / 2);
canvasCtx.lineTo(x, y);
canvasCtx.stroke();
}
}
function redrawWave(width){
if(currentBuffer == null){
return false
}
canvas.width = width;
displayBuffer(currentBuffer.getChannelData(0));
drawVertoclaLineAtX(secToCanvasX(myAudio.currentTime));
}
myAudio.ontimeupdate = function(){
redrawWave(canvas.width);
}
canvas.onmouseup = function(ev){
mx = event.clientX - parseInt(canvas.style.left) + window.pageXOffset;
myAudio.currentTime = canvasXToSec(mx);
}
loadMusic('../pics/drift.mp3');
</script>
</body></html>
也可以利用 getUserMedia 從麥克風取得音訊。此範例是把從麥克風取得的音訊重新播出,並且透過 analyser 計算出頻譜並繪製出來:
<!DOCTYPE html>
<html><head></head>
<body bgcolor="#ccccff">

<canvas id="myCanvas" width="1024" height="200" style="border:1px solid;position:absolute;top:30px;left:10px;background-color:#fff"></canvas>

<div style="position:absolute;top:250px">
<input type="button" value="Turn Off" id="micSwitch">
</div>

<script>
canvas = document.getElementById("myCanvas");
canvasCtx = canvas.getContext("2d");

source = null;
analyser = null;

navigator.mediaDevices.getUserMedia({
	audio: true,
	video: false
}).then(
	getMic
).catch(
	function(e){
		console.log(e);
	}
)

function getMic(stream){
	AudioContext = window.AudioContext || window.webkitAudioContext;
	audioCtx = new AudioContext();
	source = audioCtx.createMediaStreamSource(stream);
	analyser = audioCtx.createAnalyser();

	analyser.fftSize = 2048;

	source.connect(audioCtx.destination);
	source.connect(analyser);
	draw();
}

function draw(){
	if(analyser==null){
		return;
	}
	var dataArray = new Uint8Array(analyser.frequencyBinCount);
	analyser.getByteFrequencyData(dataArray);

	canvasWidth = document.getElementById("myCanvas").width;
	canvasHeight = document.getElementById("myCanvas").height;
	canvasCtx.fillStyle = '#fff';
	canvasCtx.fillRect(0, 0, canvasWidth, canvasHeight);
	canvasCtx.strokeStyle = '#000';
	canvasCtx.lineWidth = 1;

	canvasCtx.beginPath();
	for(var i = 0; i < analyser.frequencyBinCount; i++){
		var v = dataArray[i] / 256.0;
		var x = i / analyser.frequencyBinCount * canvasWidth;
		var y = canvasHeight - (v * canvasHeight);
		if(i == 0){
			canvasCtx.moveTo(x, y);
		}
		else {
			canvasCtx.lineTo(x, y);
		}
	}
	canvasCtx.stroke();

	requestAnimationFrame(draw);
}

document.getElementById('micSwitch').onclick = function(){
	if(this.value == 'Turn Off'){
		if(source){
			source.disconnect(audioCtx.destination);
		}
		this.value = 'Turn On';
	}
	else {
		if(source){
			source.connect(audioCtx.destination);
		}
		this.value = 'Turn Off';
	}
}

</script>
</body></html>